One of my current projects is a dome trunk that dates to around 1880. The metal brackets that connect the wooden parts on the trunk are stamped "Pat Mar 80" which I
interpret as Patent March 1880. The timing is right , since these style trunks were in vogue around this time.
There are many different styles of trunks that were made for the past 200 or so years. the heyday of the trunk was the later half of the 19
th century into the 20
th century. the fall of the trunk was the suitcase and I assume travel by air. In their time, trunks were used for extended travel or for
permanent relocation and were seen aboard steam ships, trains and stage coaches. In fact, the reason for the domed top on this trunk is to ensure
that the trunk goes on the top of the stack rather than having trunks stacked on top of it, possibly damaging the contents.
The construction of this trunk is a basic case made from pine. the outside is covered in tin that is painted black as well as tin pressed to look like
alligator skin which is painted brown. The tin is fixed to the case with nails and the tin is partially covered by retaining slats made from Elm which also help to add
strength to the whole trunk.
The inside of the trunk is lined with wall paper and is accented with
chromolithograph prints of Victorian scenes. the prints offer some possible clues towards the intended user. Often a man's trunk will have images of men and a woman's case images of women. The dominant image in this trunk is of children playing, but there is one image of a woman, so my guess is that this case was intended to be used by children or possibly by a mother. The dimensions are
a little smaller than most trunks, so this may have been for children. The
chromolithograph prints are really interesting and there were many different images available.
I believe this trunk was made in England. This would account for the use of Elm for the slats in the place of Oak. Below is a photo of some workers standing outside a trunk factory from about the same time period this trunk was made followed by some photos of the trunk and the
chromolithograph prints as it all came to me.

The dome trunk.

The trunk open showing the tray with bonnet and shirt compartments and the
chromolithographic prints

A detail photo showing one of the prints. The scene depicts children being pulled by a sled attached to a dog! The other images are
pussy willow branches, a hound dog, and a songbird.

This image shows the children with a dog surrounded by birds and flowers.

The restoration of the dome trunk involves two very different processes. the first is the restoration of the outside of the trunk and the second is the restoration and stabilization of the paper on the inside of the trunk. the first set of photos below deal with the restoration of the outside of the Trunk.
The first step was to remove the finish from the Elm slats. They were then repaired, sanded and stained to the color of the original finish. Below are two photos of the slats with the finish removed and one after the slats were stained.


the next step was to paint the black sections. the old paint had really worn
from the black sections so they needed to be repainted. The best way to do this was to mask off the parts that would not get painted and spray a paint on that would attach well to
rust and metal. Below are five photos detailing this operation. I only repainted what sections were originally black.


The next two photos show the trunk with all of the black sections repainted and the wood ready for French Polishing.


The wood and the
alligator pressed tin sections got coated with French Polish which brought out the color of the paint and the stain that I added. below is photo of the trunk during this process and close to completion.

The second half of the restoration dealt with the paper inside. all of the hinged parts had torn and needed to be repaired.Below are two lids that had become completely separated. the process of restoring them was different since each was made differently.


The grey lid above was made from cardboard and had simply torn. What I did to restore the hinge was to create a new hinge out of cardboard strips and canvas. I then created a slit in the two broken sections and inserted the hinge into the slits and glued it in place. the result is
a properly working lid with no visible hinge. here are some photos detailing the hinge creation.

the blue tape held the two pieces of cardboard together while I attached the canvas to the back

The completed hinge.

attaching the broken section of the lid.


This lid was
made of pine which was first covered with canvas and then paper. the hinge point had leather straps which worked as hinges. I was able to pull back the canvas and attach new leather hinges and then cover them over with the old canvas and paper. Below are some photos.


Here is a photo of the bonnet tray and the lids restored.


 Here is the table getting the legs glued up.
 This photo shows the damage to the leg from the caster getting pulled off.
 Here is a photo of the patch I put in so the casters can be screwed back on.
 The next two photos show the table with the finish removed.
 The table sanded and ready for staining.
 The table and pull out tray after staining.
 The last three photos show the table and tray during the French Polishing process and the leather restored.


 The restoration of the dome trunk involves two very different processes. the first is the restoration of the outside of the trunk and the second is the restoration and stabilization of the paper on the inside of the trunk. the first set of photos below deal with the restoration of the outside of the Trunk.


 The second half of the restoration dealt with the paper inside. all of the hinged parts had torn and needed to be repaired.Below are two lids that had become completely separated. the process of restoring them was different since each was made differently.
 The grey lid above was made from cardboard and had simply torn. What I did to restore the hinge was to create a new hinge out of cardboard strips and canvas. I then created a slit in the two broken sections and inserted the hinge into the slits and glued it in place. the result is a properly working lid with no visible hinge. here are some photos detailing the hinge creation.


 Here is a photo of the bonnet tray and the lids restored.


 Here is a photo of the Victorian side chair completed before going to the Caner. I fixed some mending plates which were oxidized to look old to the inside rim of the chair to prevent it from breaking again. this is also the original finish restored.
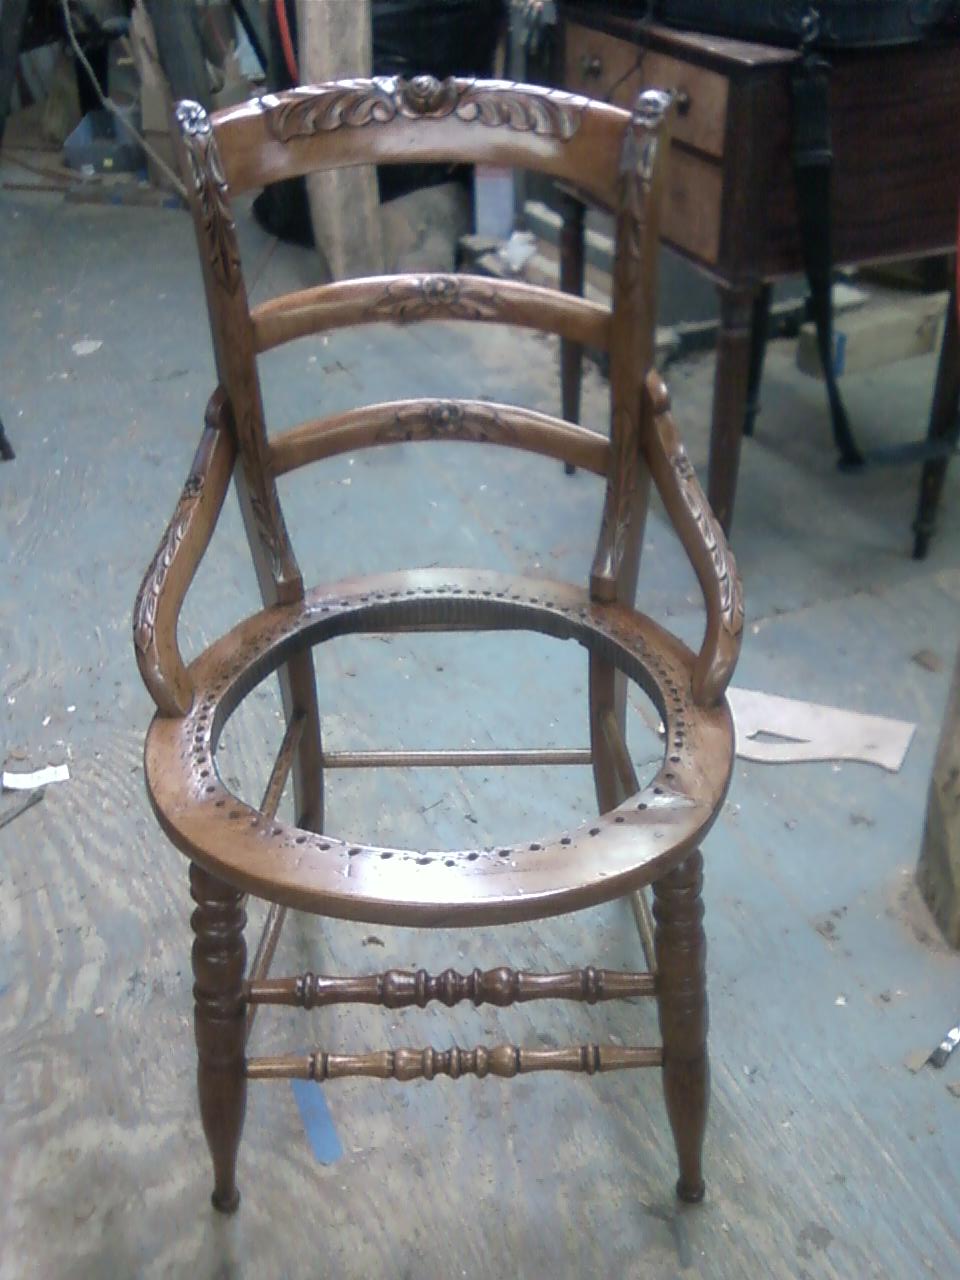 Here is the chair back from the Caner. What is interesting about this chair is that the holes in the back of the seat are spaced closer than those in the front, the result is 1) an odd number of holes, and 2) that the seat has a fan effect which can be seen in the photo below.

 Last but certainly not least is the Queen Anne sofa. the old upholstery was kept on this piece and all of the restoration concerned the framework of the legs. Once again, this is the existing finish restored.
