Welcome to my blog which follows my furniture restoration business. Please feel free to comment at the bottom of the post, and if you would like a response please leave your email address. you can also contact me directly at info@johnmarkpower.com. And by all means, if you like something please feel free to share it.

Tuesday, May 22, 2012

Reproduction Walnut Hall Tree Part 4: Restoring The Original

This post concerns the restoration of an Oak hall tree, circa 1890. The post is also part of a larger series of posts I am writing on the reproduction I am building of this piece. The key differences between the original and the reproduction are that the reproduction is made from Walnut and also that the design of the reproduction has been modified to include a storage box below the bench. The first three parts of the series deal with the fabrication of the Walnut hall tree and the last entry (part 5) will show completed photos of the two together.

As for the original, The customer and I discussed the finish and decided to leave the original finish intact to preserve the age and use of the piece. That being said, there were a few places that the finish had deteriorated beyond repair, so it was removed and replaced selectively. The hall tree was also missing a few parts and needed to have them fabricated. This included one piece of hardware which had broken. I include photos of the hardware, reproduced by Ball and Ball foundry, later in this post. The last thing the hall tree needed in terms of repair was to be glued so the joinery would be tight.Below are some photos of this process.

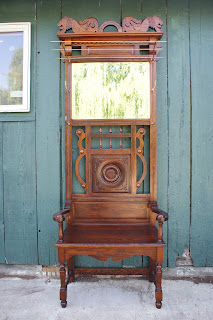
These first two photos show the hall tree as it came to the shop. The brass hooks had been removed at this point but the mirror was still intact.

Below the seat there was evidence of  stretchers that connected the front leg to the back. The absence of these stretchers had caused the seat joinery to be come loose. With no template to go on, I decided to copy the design of the turnings in the arm posts. The posts are thicker then the diameter of the stretchers, but the design elements were the same. The stretchers were about twice the length of the arm posts, so I made the stretchers have a mirror image from the center of the post design. Another way of saying that is that from the center of the stretcher the design of the arm post was copied in both directions. The photo below demonstrates this. It shows one of the two stretchers after it was turned.

I actually turned both stretchers from the same board. They can be seen below side by side on the lathe.

This photo shows the stretchers after they had been removed from the lathe and cut into individual stretchers.

This last photo shows the stretchers in place in the hall tree. Please note that the hall tree is resting on its back in this photo and that the photo shows a close up of the bench and below.
With the stretchers now fit in place, The entire seat assembly was glued. The photo below shows it during the drying process. 

As I stated earlier, certain parts of the hall tree really needed a new finish. The seat was naturally in the worst condition. This photo shows the seat with the surrounding areas taped off so that the finish can be removed.
This next photo shows the seat after the finish was removed and the seat was sanded.
The following photo shows the seat after it was stained to match the color of the hall tree.
The pediment of the hall tree consists of two carved outwards facing lions. Between these carvings in the center was evidence of a semi circular piece which bridged the two carvings. Again without a template, I took an educated guess as to what would have been there and cut an arch with a  simple "v" groove carved in it. This was also carved on the reproduction hall tree. Below you can see the pediment (removed) from the original hall tree with the new carving in place. Behind it in the photo is the reproduction pediment.The following photo is a close up of the carving followed by a photo of the carving stained to match the color of the pediment.


These next two photos show the turned stretchers before and after staining.

As stated earlier, one of the hooks had been broken at some point. I needed to have hardware made for  the reproduction hall tree, so we got an extra hook to replace the broken one. The photo below shows a complete hook on the the top with a reproduction made by Ball and Ball foundry below. 
This photo is a close up of the bottom of the hall tree and shows the refinished seat as well as the new turned stretchers.
These last photos show the hall tree after the restoration was completed. The brass bars across the top of the mirror are for holding hats with brims. There are two hooks on either side of the mirror. The next post will show completed photos of the reproduction as well as photos of the two hall trees side by side.


Friday, May 11, 2012

Heywood and Morrill Rattan Oak Pressed Back Chairs (ca. 1900)

Recently I restored three chairs made by the Heywood and Morrill Rattan Company of Chicago, Illinois. All three chairs were made of Oak around 1900 give or take a few years. The chairs were what is known as "pressed back chairs" due to the nature of how the backs are decorated. For a closer look at the process of how these chairs are made, You can read an earlier post I wrote on another similar chair. here is the link:

 http://johnmarkpower.blogspot.com/2010/09/repairing-oak-pressed-back-side-chair.html

For information on the Heywood and Morrill Chair company, here are a few links:

  http://en.allexperts.com/q/Collectibles-General-Antiques-682/2011/1/Heywood-Merrill-Caned-Chair.htm

This second link requires a little scrolling to find the history of this particular furniture company:

http://mwcc.edu/gardnerfurniture/BriefHistory.htm

this last link is to Flickr and shows some great images of the old Heywood chair factories. There is one particular image of  a man standing next to a truck load of rattan chairs that I love:

http://www.flickr.com/search/?w=all&q=heywood+chair+factory&m=text
 
Below is a photo of the remains of one of the labels on the bottom of the seat that led me to identifying these chairs.

The chairs were all loose and needed to be glued and in addition, one needed a new stretcher turned and they all needed new pressed in Cane seats. Below is a photo of one of the chairs disassembled so that the joints could be cleaned and the chair reglued.
This next photo shows the three chairs being glued up.
This final photo shows the chairs after they had been taken to the caner. All three chairs had the old seats removed and new cane installed.

Tuesday, May 8, 2012

Elizabethan Revivial Oak Dining Table (ca. 1920)

I recently received an Oak dining room table in my shop that was made around 1920, probably in England.It is similar to an earlier table I worked on, which can be seen in the link below:

http://johnmarkpower.blogspot.com/2010/12/quarter-sawn-oak-draw-leaf-diningtable.html

Both tables are made in the style of 17th century Oak English Furniture and are dubbed "Elizabethan Revival" by those who name furniture periods. This table was a good deal larger than the table I linked to above and would qualify as a dining table, due to it's size. Like the previous table, the top had quartersawn Oak veneer glued to a substrate which was framed with solid Oak ends that were mitered at the corners. The top had two draw leaves which pulled out from either side and would move into the proper position to extend the table by about four feet.

Over all, the condition of the table was pretty good and It showed signs of being worked on in the past, the finish had definitely been replaced at some point which was evident due to the presence of stripper marks on the underside of the table. The main issue was a worn finish on the top and some missing and loose veneer. The base also had some large cracks that needed to be filled. The finish on the  apron and the base was nice enough to restore, so the surfaces I refinished were the top and the draw leaves. Below are some photos of the process.

Here is a photo of the top of the table as it came to me,
....and here is the base,
...and the leaves.

After the finish was removed from the top, the first order of business was to glue down all of the loose veneer and to patch the missing veneer. Most of this was along the edge of the veneered surface, so I was just able to get my clamps to reach in enough to clamp down the veneer. The photo below shows the veneer being glued down.
This photo shows the draw leaves after the finish had been removed.
After the glue for the veneer had dried overnight I removed the clamps and sanded the surface smooth. The photo below shows the Oak veneer patches I put in one of the corners before I sanded the entire surface.
After the top was sanded, the next step was to add some color to the top to match the base. Here is a photo of the top after it was stained. I think there may be a coat or two of  shellac on the surface at this point.

The finish on the base was cleaned with mineral spirits, and then alcohol. I then applied finish to the old finish to clean it up. This photo was taken during the cleaning process.

These last four photos show the table completed with a French polish shellac finish. The very last photo shows the quartersawn Oak veneer well.